Unlocking the Power of Redis: A Journey into Lightning-Fast Data Management
Redis is not just any database, but an in-memory data storage device that delivers extraordinary speed and efficiency. Short for Remote Dictionary Server, Redis is the main choice for developers who prioritize optimal performance and seamless scalability. Let’s take a deeper look at Redis: what it is, why we choose it, its benefits, and implementation steps.
Redis: Its Basics and Technical Features
- In-Memory Storage: Redis differentiates itself by storing the entire dataset in RAM. Thus, read-write operations can be performed instantly without the latency typically associated with disk-based databases.
- Flexible Data Model: Although known as a key-value database, Redis offers flexibility by supporting a variety of data structures. From strings to lists, sets, and hashes, Redis provides developers with a variety of tools to model their data effectively.
- Sub-Millisecond Latency: Redis achieves impressive low-latency performance, often in the sub-millisecond range. This fast response is a vital differentiator in situations that demand real-time data processing and high throughput.
- Controlled Persistence: Although Redis operates primarily in memory, it offers customizable persistence options. This allows developers to adjust the level of persistence according to their application needs.
Workflow and Practical Implementation
- Data Model Planning: The initial step is to define a data structure that suits the application requirements. Whether it’s a simple key-value, list, set, or more complex data structure, Redis provides a rich variety of options.
- Connection Establishment: Redis supports communication between clients and servers through lightweight protocols. Establishing this connection is a critical step in initiating interaction between the application and the Redis data store.
- CRUD Operations: Redis simplifies Create, Read, Update, and Delete (CRUD) operations. High-speed data insertion, fast data retrieval, value updates, and entry deletion can be done easily.
- Pub/Sub Paradigm: Redis implements a publish/subscribe paradigm that enables real-time communication between various application components. This facilitates event-driven architecture and improves system responsiveness.
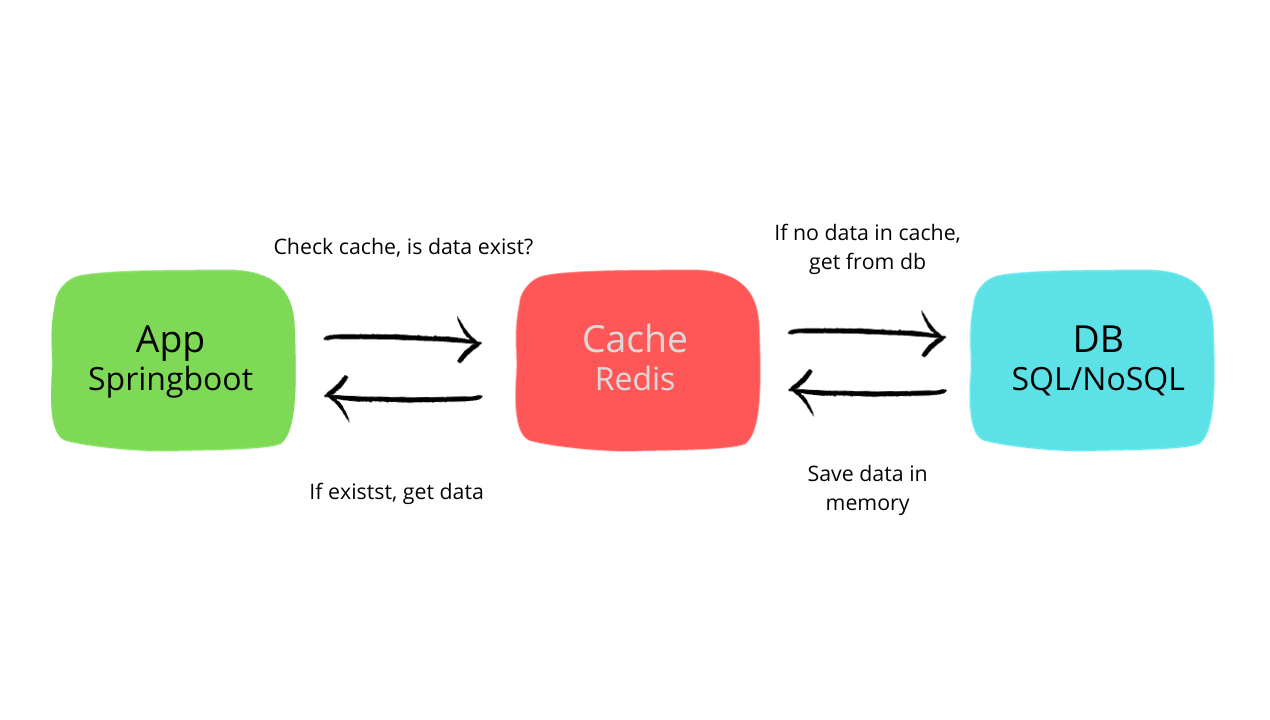
The Springboot application checks whether the required data already exists in the Redis Cache. If data is found, it is fetched directly from the cache. If not, the application continues to check in the SQL/NoSQL Database. Once data is fetched from the database, it is stored in cache for quick access in the future. On this occasion I will practice a simple crud with springboot by using redis as temporary storage and postgresql
Building Simple CRUD with Spring Boot and Redis
Following are the technical steps to create a simple CRUD application using Redis and Spring Boot:
Preparation:
Initialize the Spring Boot project and include the required dependencies, including the Spring Data Redis starter.
<dependencies>
        <dependency>
            <groupId>org.springframework.boot</groupId>
            <artifactId>spring-boot-starter-data-jpa</artifactId>
        </dependency>
        <dependency>
            <groupId>org.postgresql</groupId>
            <artifactId>postgresql</artifactId>
            <scope>runtime</scope>
        </dependency>
        <dependency>
            <groupId>org.springframework.boot</groupId>
            <artifactId>spring-boot-starter-web</artifactId>
        </dependency>
 <!-- Serializer Json -->
        <dependency>
            <groupId>com.fasterxml.jackson.core</groupId>
            <artifactId>jackson-databind</artifactId>
            <version>2.16.1</version>
        </dependency>
        <!-- Spring Data Redis -->
        <dependency>
            <groupId>org.springframework.boot</groupId>
            <artifactId>spring-boot-starter-data-redis</artifactId>
        </dependency>
        <dependency>
            <groupId>org.springframework.boot</groupId>
            <artifactId>spring-boot-devtools</artifactId>
            <scope>runtime</scope>
            <optional>true</optional>
        </dependency>
        <dependency>
            <groupId>org.projectlombok</groupId>
            <artifactId>lombok</artifactId>
            <optional>true</optional>
        </dependency>
</dependencies>
The dependencies used in this project include several key libraries for building efficient Spring Boot applications. spring-boot-starter-data-jpa provides support for data access using the Java Persistence API (JPA), while postgresql provides drivers for integration with PostgreSQL databases. The spring-boot-starter-web library is used to develop web applications with Spring MVC. On the JSON serialization side, jackson-databind version 2.16.1 provides the necessary tools. Then, to integrate Redis, spring-boot-starter-data-redis is used. The spring-boot-devtools and lombok (optional) libraries facilitate development with hot-reloading features and simplify code writing. Overall, these dependencies provide a strong foundation for Spring Boot application development with support for JPA data access, PostgreSQL, JSON serialization, and Redis.
# PostgreSQL
spring.datasource.url=jdbc:postgresql://localhost:5432/postgres?currentSchema=products
spring.datasource.username=username
spring.datasource.password=password
spring.datasource.driver-class-name=org.postgresql.Driver
spring.jpa.hibernate.ddl-auto=update

# Redis
spring.redis.host=compose-db
spring.redis.port=6379
Before diving deep into the application details, ensure that you have properly configured the connection properties for both PostgreSQL and Redis in your application.
Configuration Redis
@Configuration
@EnableCaching
public class CacheConfig {

    @Bean
    public RedisTemplate<String, Object> redisTemplate(RedisConnectionFactory redisConnectionFactory) {
        RedisTemplate<String, Object> redisTemplate = new RedisTemplate<>();
        redisTemplate.setConnectionFactory(redisConnectionFactory);

        // Menggunakan Jackson2JsonRedisSerializer dengan konfigurasi default Jackson
        Jackson2JsonRedisSerializer<Object> jsonSerializer = new Jackson2JsonRedisSerializer<>(Object.class);
        redisTemplate.setDefaultSerializer(jsonSerializer);
        redisTemplate.setKeySerializer(redisTemplate.getStringSerializer());
        redisTemplate.setValueSerializer(jsonSerializer);

        return redisTemplate;
    }

    @Bean
    public CacheManager cacheManager(RedisConnectionFactory redisConnectionFactory) {
        Jackson2JsonRedisSerializer<Object> jsonSerializer = new Jackson2JsonRedisSerializer<>(Object.class);

        RedisCacheConfiguration cacheConfiguration = RedisCacheConfiguration.defaultCacheConfig()
                .entryTtl(Duration.ofMinutes(60))
                .serializeValuesWith(RedisSerializationContext.SerializationPair.fromSerializer(jsonSerializer));

        return RedisCacheManager.builder(redisConnectionFactory)
                .cacheDefaults(cacheConfiguration)
                .build();
    }
}
This Redis configuration aims to integrate Redis with Spring Boot applications and facilitate caching. In this configuration, RedisTemplate is used to set up the connection to Redis and includes the Jackson2JsonRedisSerializer to handle serialization of objects to JSON format. CacheManager is set to use RedisCacheConfiguration with a cache entry timeout of 60 minutes and uses the Jackson2JsonRedisSerializer serializer. With this configuration, applications can optimize performance by storing compute-intensive data or database access results in the Redis cache, speeding up response and reducing server load.
Model Entity
@NoArgsConstructor
@Data
@AllArgsConstructor
@Builder
@Entity
public class Product implements Serializable {
    @Id
    @GeneratedValue(strategy = GenerationType.AUTO)
    private Long id;

    private String name;
    private int price;
    private String description;
}
The Product Model is a representation of objects in an application using the Java Persistence API (JPA). With the @NoArgsConstructor, @Data, @AllArgsConstructor, and @Builder annotations, this model is made more concise and easier to use. There are four main attributes, namely id as the main key which is generated automatically, name as the product name, price as the product price, and description as the product description. Thus, these entities are ready to be used to represent products in the system and can be saved and retrieved from PostgreSQL databases easily using Spring Data JPA.
Repository
@Repository
public interface ProductRepo extends JpaRepository<Product, Long> {

}
The ProductRepo interface is part of Spring Data JPA and serves as a repository for the Product entity. By implementing JpaRepository<Product, Long>, this repository automatically supports basic CRUD (Create, Read, Update, Delete) operations on the Product entity. Spring Data JPA generates repository implementations automatically based on method naming conventions, eliminating the need to write custom implementations for basic operations. Using this repository, you can easily perform database operations on Product entities without writing a lot of boilerplate code.
Service
@Service
public class ProductService {
    private final ProductRepo productRepo;
    private final Logger logger = Logger.getLogger(ProductService.class.getName());

    public ProductService(ProductRepo productRepo){
        this.productRepo = productRepo;
    }

    @Cacheable(value = "allProduct", key = "'products'")
    public List<Product> getAllProducts(){
        logger.info("Fetching all products from database");
        List<Product> products = productRepo.findAll();
        logger.info("Retrieved " + products.size() + " products from database");
        return products;
    }

    //delete product
    //menghapus (evict) satu atau lebih entri dari cache.
    @CacheEvict(value = "allProduct", allEntries = true)
    public void deleteProduct(Long id) {
        logger.info("Deleting product with ID: " + id + " from database");
        productRepo.deleteById(id);
        logger.info("Product deleted successfully");
    }
}
In the ProductService class, there are two main functions: getAllProducts and deleteProduct. The getAllProducts function is annotated with @Cacheable, which indicates that the results of this method are cacheable. In this case, the cache named “allProduct” will store the results of this method with the key “products”. So, if this method is called with the same parameters, the value already in the cache will be returned without having to run the actual method, optimizing performance.
Meanwhile, the deleteProduct function is annotated with @CacheEvict, which indicates that using this method will trigger the deletion of a particular entry or all entries from the cache. In this case, the “allProduct” cache will be emptied (allEntries = true) after calling this method, ensuring that the cache is updated after the product entity is deleted from the database. This helps maintain consistency between the cache and the data in the database, avoiding outdated or inaccurate information in the cache.
Controller
@RestController
@RequestMapping("/products")
public class ProductController {
    private final ProductService productService;

    public ProductController(ProductService productService){
        this.productService = productService;
    }

    //get
    @GetMapping
    public List<Product> getAllProducts(){
        return productService.getAllProducts();
    }

    //delete
    @DeleteMapping("/{id}")
    public void deleteProductById(@PathVariable Long id){
        productService.deleteProduct(id);
    }
ProductController is a controller class that handles HTTP requests to get a list of products (getAllProducts) and delete products by ID (deleteProductById) by leveraging services from ProductService. To run a Spring application, start by running the main method or using the ./mvnw spring-boot:run command in the terminal after ensuring that all dependencies and configurations are met.
Run Redis Server and Monitor via CLI
Setelah anda sukses menjalankan server spring, sekarang saatnya untuk memulai redis-server dan redis-cli untuk monitoring aktivitas dari client. saya menjalankan redis menggunakan docker-compose, untuk menjalankannya cukup berikan perintah `docker-compose up -d redis` di terminal, make sure your docker is running before running the compose command.
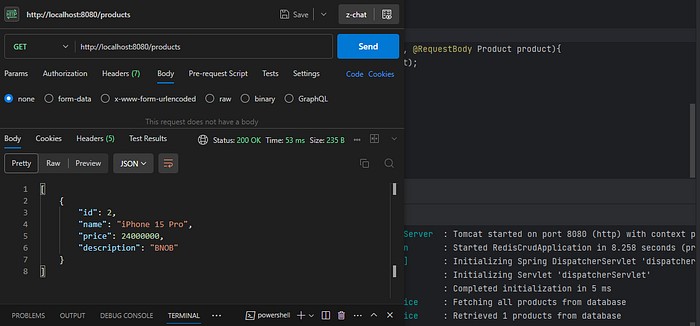
The image above shows when the client requests a request to load all the data in the product, it looks like the service function is working here as seen in the log on the server side. If you remember there is the @Cacheable annotation, it means the data will be stored with a certain key when getting data, so that when the client requests data again with the same endpoint the service will not run because spring will send data from Redis if it exists.
version: "3.8"

services:
  redis:
    image: redis:7.2.3
    container_name: redis-container
    ports:
      - "6379:6379"

  elasticsearch:
    image: docker.elastic.co/elasticsearch/elasticsearch:7.16.3
    container_name: elasticsearch-container
    environment:
      - discovery.type=single-node
    ports:
      - "9200:9200"

  spring-app:
    build: .
    depends_on:
      - redis
      - elasticsearch
    ports:
      - "8080:8080"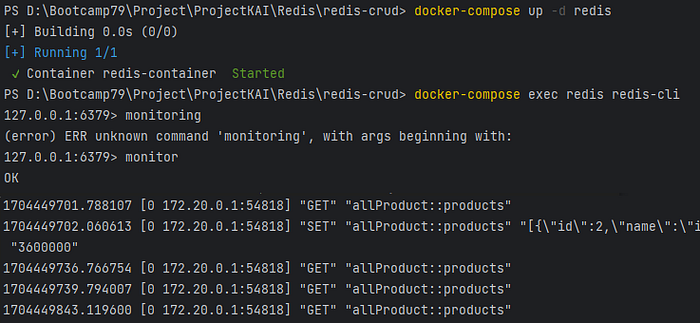
As you can see on the redis-cli monitor, when a client requests data and there is no data in memory it will automatically cache the data and store it temporarily in memory. Below it is proven that when I want to re-request the same data, the spring server does not run the getAllProduct function but uses the cache that has been stored. This is very efficient in providing the same information as needed by the client, quickly and without needing to requery from the database.
In this article, we explore Redis as an in-memory data storage solution that excels in speed and flexibility. Redis provides high performance with low latency, supports a variety of data structures, and can be effectively integrated with Spring Boot applications. Through understanding Redis configuration, entity models, repositories, and cache usage, this article helps readers understand Redis’ potential to improve responsiveness and efficiency in application data management. With a simple CRUD implementation using Spring Boot and Redis, this article invites readers to experience firsthand the benefits of Redis in modern application development.